Followers

Monday, August 27, 2012

FANTABULOUS CRICUT's "BACK TO SCHOOL"
CRICUT CRAWL!

Welcome to Lets Get Scrappy Together and the 8th Fantabulous Cricut Crawl...Fantabulous Cricut's version of a Blog Hop!


Summer is coming to an end and we are all getting ready for BACK TO SCHOOL...each Design Team member will be featuring an original BACK TO SCHOOL project that includes a school related item, such as crayons, rulers, pencils, book, school bus, ect.  with at least one Cricut cut.

If youve come from visiting Kate at Small Bits of Paper , youre in the right place!  If youve just happened across my blog and would like to play along with our Fantabulous Cricut Crawl, start HERE. 

Be sure to check out each Design Team members blog for some great inspiration!  There will be PRIZES along the way at our Design Team members blogs, and there will  be a GRAND PRIZE up for grabs at FANTABULOUS CRICUT for one participant that submits a "BACK TO SCHOOL" project!

How fun is that?

Now, on to my BACK TO SCHOOL projects...


Bookbag and notepads!
 
For these projects I used the following cartridge and measurements.  Campin' Critters-
backpack (pg 69), cut at 11 1/2 inches...and book (pg 70), cut at 4 inches.
 
Embellishments used were buttons along with leaf bud green and ocean blue ink.  I also left the bed roll off of the top of the backpack to give it more of a bookbag look.
 
The books can actually be used for little notepads...they have lined paper inserted inside
for writing on.


Front of "pop up" card (5x7)

 
Inside...arent those lil' worms cute?
 
For this card I used the following cartridges and measurements.  Car Decals-girl #5/family
(pg 63), cut at 1 1/2 inches and boy #5/family (pg 65), cut at 1 1/2 inches...Create a Critter-apple/shadow(pg 25), cut at 3 inches and caterpillar/shadow (pg 54), cut at 2 3/4 inches and 3 inches...Kate's ABCs-welcome back/school days, cut at 1 inch...Plantin SchoolBook-mixed letters and numbers, cut at 1 inch...
 
This was really an easy card to make and a lot of fun too...The only extras added, were chalkboard paper and  the googly eyes!  I had planned on using chalk on the inside, but found that it smeared quite a bit...and didnt have a clean look, so I decided to go with a paper that was close to chalk in color. 
 
 
Okay, are you ready for a chance to win a PRIZE for visiting my blog during our Cricut Crawl?  All you have to do is be a follower and leave a comment!   I will select a winner using random org...and announce the winner on September 3, 2012...at the start of the new challenge over at FANTABULOUS CRICUT.
 
 
THE PRIZE
A
$15.00 gift certificate for Mo's Digital Pencil


This has fast become my favorite site for digital stamps...
Stop by and see all of the cute stamps they have to offer...
you wont be disappointed!
 
 
Okay, now its your turn...Lets see your BACK TO SCHOOL projects!  Make sure to include a Cricut cut somewhere on your project in order for your project to qualify.
 
Next stop on the Cricut Crawl...Megans blog, Saxey Designs  Stop by and see what she has in store for you today...and when youve finished visiting the Design Team members, make sure you link up your project to Fantabulous Cricut Crawl post to be entered into the contest!
 
Happy Crawling and enjoy !
 

Saturday, August 18, 2012

JUST LETTING YOU KNOW...

I havent deserted my blog...just suffering from a very bad sinus/ear infection and am unable to post at the moment, but I will be back as soon as the meds start to work.  Again, sorry I havent responded to comments or made comments on others blogs...hopefully soon!  Kathie

Tuesday, August 14, 2012

WE HAVE A WINNER!

Using random org a winner was chosen and the winner is KARON (karonskraftykorner)!   So Karon, if you would please
get a hold of me using the email address located on the right...
I will get you set up with your gift certificate.  Congrats!


Also, for those that have become new followers...I would love to return the favor and join your blogs.  You can add your blog site to the comment box below and Ill be sure to stop by!

Monday, August 13, 2012

FANTABULOUS CRICUT CHALLENGE #124
THE OLYMPICS!

HI ALL!  ITS MONDAY AND YOU KNOW WHAT THAT MEANS...ITS TIME FOR ANOTHER SUPER "CHALLANGE ME MONDAY"  OVER AT FANTABULOUS CRICUT !  THIS WEEKS THEME IS INSPIRED BY THE OLYMPIC GAMES THAT HAVE BEEN GOING ON AND ITS UP TO YOU TO CREATE AN AWESOME PROJECT THAT IS SPORT(S)  RELATED.   SO GET READY,  RUN TO  YOUR CRAFT AREAS AND GET CRAFTY!  DONT FORGET TO CHECK OUT THE OTHER DESIGN TEAM MEMBERS PROJECTS TO GET SOME INSPIRATION OR SIMPLY ENJOY.


My kids and I have watched the Olympics pretty much from the start and weve really enjoyed seeing the athletes represent their countries so well in all events, but I must say, swimming, high dive and track/field are our most favorite events of all.  So, for my project I decided to make a card with the swim teams in mind.  Hope you like it.


Go for the gold!

For this card I used the following cartridges and measurements.  George and Basic Shapes-circles
(pg 108), cut at 1 3/4 inches and 1 1/2 inches, Plantin SchoolBook-letters and numbers, cut at
3/4 inch and Sports Mania-swimmer (pg 68), cut at 1/2 inch, 3/4 inch, 1 inch and 1 1/2 inches.

To make this card I created a mat using red, black and white card stock to place on the black card base.  I then cut the Olympic rings using my Gypsy...this was done by placing the smaller circles into the larger ones and cutting.  After the rings were made, I simply made a small cut in the yellow and green rings and wove them around the top three rings.

The rest of the card is simply assembling the images and lining up the letters/numbers where youd like them placed. 

Thanks so much for stopping by and having a look.  Kathie


Friday, August 10, 2012

Welcome to the Back to School Blog Hop, brought to you by the fabulous design teams of Made Especially For You and the GoFish Challenge Blog!


These two design teams have joined together to bring you some fun and crafty inspiration to help you get started on those back to school projects! If you've just come across the hop and would like to start at the beginning, please visit Made Especially For You.

 
Hello everyone!  I hope you all are having a great time
visiting all of the blogs on todays hop and enjoying the wonderful projects the ladies have made.  We have some
really talented crafters and you dont want to miss out on any of the inspiration they have to offer...and please dont forget to show your love by leaving a kind word.

Since this is my first ever blog hop that Ive been a part of, I want to celebrate by giving away a


$10.00 gift certificate for Mo's Digital Pencil! 
One lucky winner will be selected and announced on August 14th...and all you have to do for a chance to win,  is be or become a follower of my blog and leave a comment.   Good luck!

Now on to my project...While I was making this card, I couldnt help but think back to when each of my children were just starting school for the first time...watching them wait for the "BIG" yellow bus with their bookbags at the ready and seeing the smiles on their faces as they
wondered what the day held for them.  Oh, and lets not forget the joy they had to share once they got home.


Ready, set, go!

For this card I used the following cartridges and measurements.  Potpourri Basket-school bus/shadow (pg 63), cut at 5 inches and Plantin SchoolBook-mixed letters and numbers, cut at 3/4 inch.

I also used three of the Mos digital pencil images that are just perfect for a school project. 
The first image (Yale) far left was colored using the following Copic markers...Flesh-E000, E00, E01 and R20...Hair-YR20, YR23 and YR31...Outfit-YG91, YG93, YG95, YG97, E35, E37, E44 and E47...Shoes-E53, E55 and E57...Bookbag/books-B21, B23, BV11, BV15, YR04 and YR07.

For the second image (Dundee) center...Flesh-E00, E01, E11 and R20...Hair-E44, E47 and E49...Outfit-B32, B34, B37, R24, R27, G24, G28, Y35 and Y38...Bookbag/books-B93, B97, YR04, YR07, E13, E15, BG11 and BG15.

The third image (Berkley) far right...Flesh-E11, E13, E15 and R22...Hair-E35, E37 and E39...Outfit-B91, B93, B97, RV32, RV34, BV11, BV13, V12 and V15...Bookbag-BG11, BG15 and BG18...Apple-R24 and R27.  I also used a little Glossy Accents on the apple.

Thanks for stopping by and enjoy the rest of the hop!  Kathie
We have some wonderful sponsors giving away prizes to those who comment on EVERY stop of the hop! Let's see what they have to offer...

$15 Gift Certificate

$20 Gift Certificate

3 images of the winner's choice

You must comment on every stop of the hop to be eligible to win a prize. Hoppers have through Sunday August 12th to comment. Winners will be randomly chosen and announced on Made Especially For You on Tuesday August 14th. 

Your next stop is PAMs blog.

Here's the entire lineup in case you get lost along the way:


Thanks so much for hopping along with us!

Wednesday, August 1, 2012

GO FISH!  CHALLENGE #22-SHAPES

Hello everyone.  First, I just want to say what a wonderful turnout we had over at Go Fish! for our last challenge...you all entered some super creations and it was really fun to look at them all.  A super job was done by everyone!

And now onto our new challenge...are you ready?  Its a SHAPE challenge and youll need to create a project that features either a triangle or circle...or maybe even both.  Its all up to you, so get those creative juices flowing and start creating!  We cant wait to see what you make this time around. 

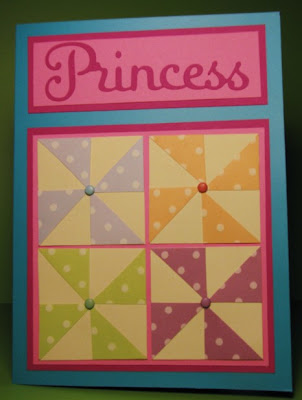
For my project I went with a baby card and used a quilt pattern called Pinwheel...its just a different take on the Variable Star.  I hope you like it.   Also, dont forget to check out the rest of the Design Teams wonderful creations and most of all, have fun creating!


Baby girl

For this card I used the following cartridge and mearsurement.  Sugar and Spice (lite)-Princess,
cut at 1 inch.

To make the base of the quilt square I cut the dark pink paper at 4 1/2"x 4 1/2" and the light pink  paper at 4 1/4"x 4 1/4"...I then centered and layered the light pink paper on top of the dark pink paper.

For the four individual squares I cut cream colored paper at 2"x 2"...I then selected the patterned paper I wanted to use and cut eight 1"x 1" squares and cut them evenly from point to point.  Once this was done I placed them in the design I had choosen and glued them down with Zig glue and placed a
matching mini brad in the centers.  This was then place onto the larger quilt square that
I had made earlier.

Lastly, I made a title block to place at the top of the card.  The dark pink paper was cut
at 1 1/2"x 4 1/2" and the light pink was cut at 1 1/4"x 4 1/4"...after the papers were layered,
I centered the title and adhered it to the card. 

Thanks so much for stopping by and having a look.  Kathie